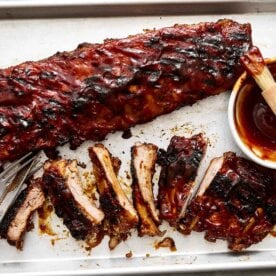
These baby back ribs are my secret for the best cookout meal. After more than a decade of making them every summer, I can guarantee the ribs will be fall-apart tender and loaded with flavor. You can finish them on the grill or under the broiler with a homemade spiced rum pineapple BBQ sauce that readers have been calling their favorite for years!

Why You’ll Love These Baby Back Ribs
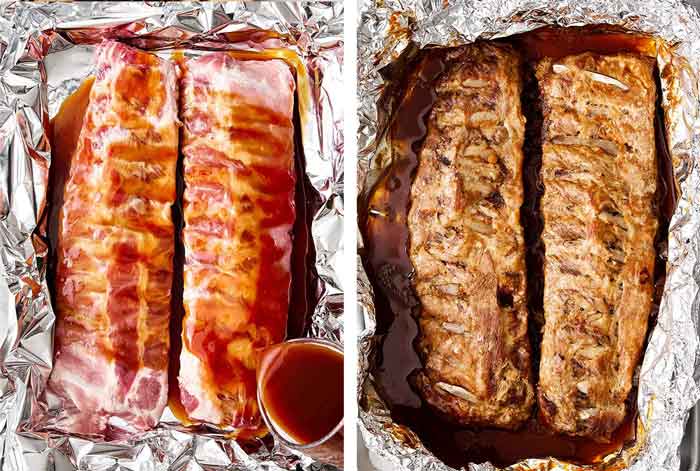
- The oven baked method works every time. I bake the ribs low and slow, with some thinned-out BBQ sauce, wrapped in foil in the oven. That’s how you get fall-apart tender meat!
- Two finish options. You can finish the ribs in the oven under the broiler or on the grill for the perfect char. It’s up to you!
- A homemade sauce that will have you going back for seconds. Crushed pineapple, blackstrap molasses, maple syrup, and spiced rum create a flavor that no store-bought bottle can match! It’s my mom’s secret recipe.
If there’s one thing Downshifters come to me for, it’s perfectly cooked meat. Especially cookout classics like BBQ chicken, grilled ribeye steak, and pulled pork (aka reader favorites!).
But the one dish I always remind people of is these baby back pork ribs. It was an early recipe on the website (that’s been updated with new photos!) and is single-handedly one of the easiest meats to cook. You literally just pour the sauce over the ribs, wrap them in foil, and oven steam them away. Pure tender perfection!
The real star, though, is the BBQ sauce. It’s a blend that my mom originally concocted (in fact, this baby back ribs recipe is hers), and while the ingredients may sound wildly specific, each piece is doing real work that a bottle of commercial sauce can’t replicate. Make it once, and you’ll understand why everyone raves about the amazing flavor of these oven-baked ribs!
Baby Back Ribs Ingredients

- Babyback pork ribs: Look for racks that are about 2 to 2½ pounds each, with the meat running evenly across the bones. And don’t be shy about asking the butcher to remove the membrane for you. It’ll save you a step at home!
- For the spiced rum pineapple BBQ sauce:
- Blackstrap Molasses: This is the secret to the sauce’s depth. It’s the most concentrated, least sweet form of molasses, giving the sauce a dark, slightly bitter backbone without tipping into candy territory.
- Crushed Pineapple: Don’t drain it! The juice is part of the sauce, and pineapple’s natural enzymes act as a subtle meat tenderizer too.
- Spiced Rum: I’ve made this without it. It’s fine. With it, it’s special. The rum adds warmth and complexity that changes the whole character of the sauce. And if you’d like to add a little more, be my guest!
- Dijon Mustard + Worcestershire: These are the savory bits that keep this sauce from tasting like a dessert topping. Don’t skip either!
- Garlic + Cayenne Pepper + Ground Ginger: These give the sauce its little kick at the finish.
Find the printable recipe with measurements below.
How To Make BBQ Ribs

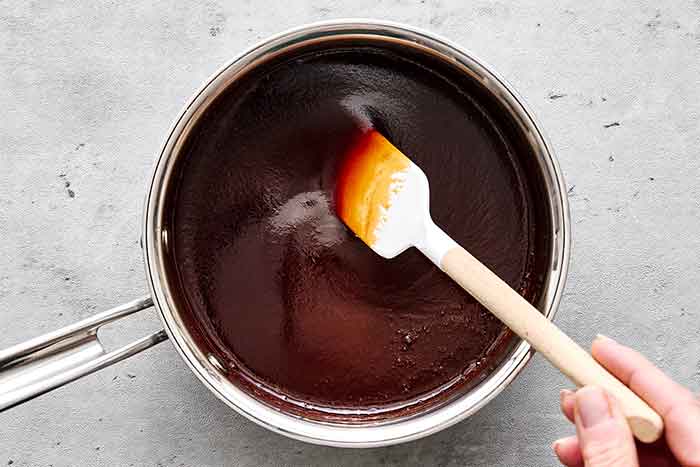
Step 1: Simmer the sauce. In a medium pot over medium heat, stir together the ketchup, maple syrup, and molasses. Simmer for 2 to 3 minutes, just until the mixture is combined and begins to thicken.

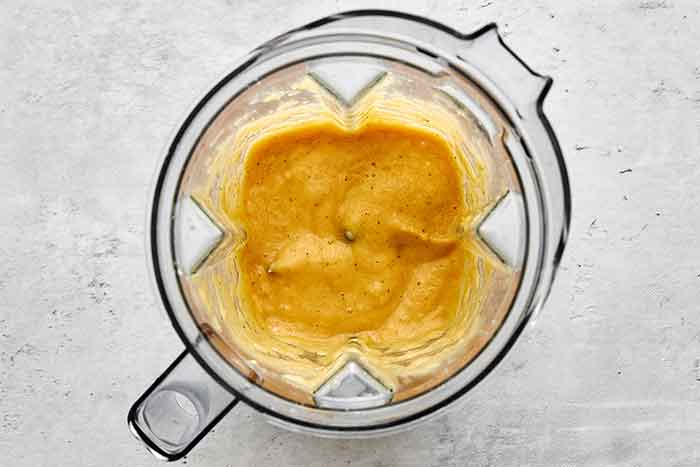
Step 2: Blend and finish the sauce. Meanwhile, add the pineapple, garlic, spiced rum, mustard, Worcestershire sauce, salt, pepper, ginger, and cayenne to a high-powered blender and blend until completely smooth. Transfer the blended mixture into the simmering pot and stir together for 3 to 4 minutes more, then turn off the heat. You should have a glossy, deeply flavored sauce.
Lisa’s process tip: I blend the pineapple mixture separately before adding it to the simmering base. This makes the sauce incredibly smooth, and it ensures the garlic and spices are completely incorporated. It’s one extra step, but it makes a real difference in the final sauce.

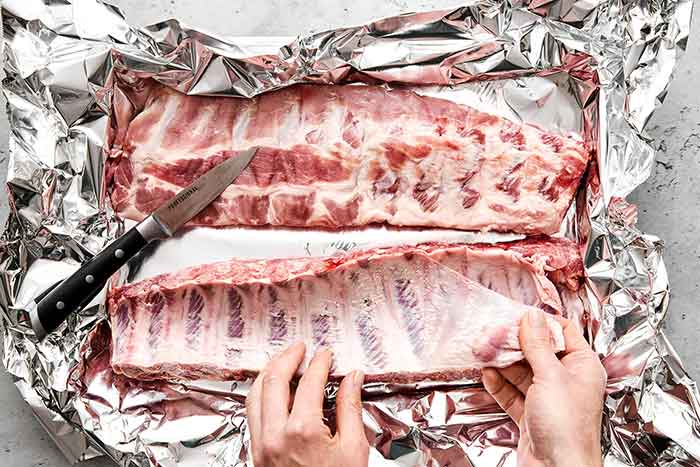
Step 3: Prep the ribs. First, line a large baking sheet with aluminum foil, using enough overhang to wrap the ribs loosely. Remove the thin membrane on the underside of the ribs — it’s the thin, shiny film that runs along the bone side. Slide a butter knife under one corner, grab it with a paper towel for grip, and peel it away in one long strip. You can also ask your butcher to do this when you buy your ribs. Most are happy to help! Then, place the ribs on the foil-lined baking sheet.
Lisa’s mess-preventing tip: I always double-layer the foil to prevent any sauce from leaking onto the pan. It also makes clean-up a breeze!

Step 4: Bake. Mix 1 cup of the sauce with an equal amount of water and pour it over the ribs on a foil-lined sheet pan, then wrap them up and bake at 275°F (135°C) for 3 hours. The low, gentle heat and the steam from that liquid turn the ribs meltingly tender, almost to the point where the bones slide right out!
A note about handling: After 3 hours, your ribs will be VERY tender. Use two sets of tongs when transferring them (one at each end of the rack), and move slowly. This comes from personal experience of watching a rack fold in half on the way to the grill. It’s not a catastrophe, but it is a little dramatic, lol.
Two Ways to Finish: Here’s Which One I Prefer
Once the ribs come out of the oven, you have a choice. Both methods work beautifully, so it really comes down to whether you have an outdoor grill available.

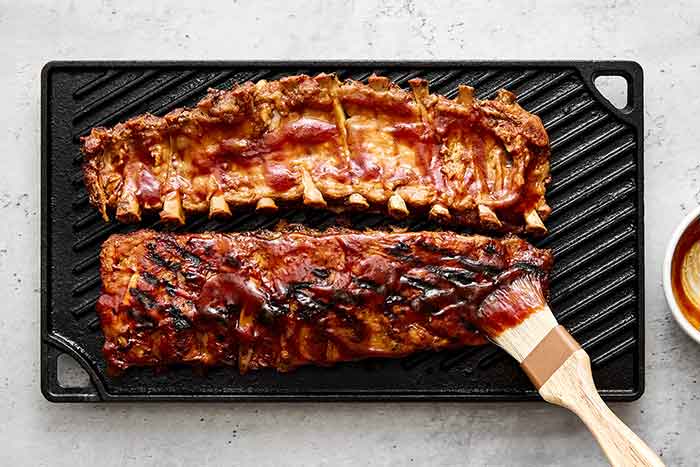
Option 1: Finish on the Grill (My Preferred Method)
This is how I do it almost every time. The grill adds a layer of char and smokiness that an oven can’t quite do, and it caramelizes the sauce in a way that gives you those gorgeous, lacquered ribs you see at great BBQ spots. Just heat your grill to medium-high heat, and cook 3 to 4 minutes per side, brushing with additional sauce as you go. The sugars in the maple syrup and molasses caramelize fast, so watch closely!

Option 2: Broil in the Oven
If you don’t have a grill, the broiler is a great alternative. Discard the watered-down foil liquid, place the ribs back on the clean baking sheet, brush generously with sauce, and broil the meat-side up for 3 to 4 minutes. You won’t get the smokiness, but you’ll get beautiful caramelization and a sticky glaze that’s deeply satisfying and delicious.
Serving & Storage Suggestions
These ribs truly are the main event, so I like to keep the sides simple. A creamy coleslaw or tangy vinegar coleslaw are my go-to’s. But grilled corn on the cob, a simple cucumber salad or creamy cucumber salad, plus any of your favorite BBQ side dishes, will round out the meal.
While leftovers are hard to come by (these ribs always get gobbled up!), if you happen to have any left, you can store them for 4 to 5 days in the fridge or up to 3 months in the freezer.

More Cookout Mains
- Carne Asada: Perfect for tacos!
- Beef Shish Kabob: The best beef kabobs.
- Grilled Shrimp: I love how fast this cooks.
- Hot Honey Chicken Drumsticks: Always a crowd favorite.
If you make these baby back ribs, I’d love to hear how they turned out in the comment box below! Your review helps other readers in the community. And if you’re looking for more healthy food inspiration (and exclusive content), join my free newsletter.
Description
Video
Equipment
Ingredients
For the ribs
- 2 racks of baby back pork ribs
For the spiced rum pineapple sauce
- 1 cup ketchup
- ¾ cup maple syrup
- ¼ cup blackstrap molasses
- 1 cup crushed pineapple with juice
- 2 garlic cloves, minced
- 2 tablespoons spiced rum
- 1 tablespoon Dijon mustard
- 1 tablespoon Worcestershire sauce
- 1 teaspoon kosher salt
- ½ teaspoon ground black pepper
- ¼ teaspoon ground ginger
- ¼ teaspoon cayenne pepper
Instructions
- Simmer the sauce. In a medium pot over medium heat, stir together the ketchup, maple syrup and molasses. Simmer for 2 to 3 minutes.
- Blend and add to sauce. Meanwhile, add the pineapple, garlic, spiced rum, mustard, Worcestershire sauce, salt, pepper, ginger, and cayenne pepper to a high-powered blender and blend until smooth. Transfer the blended ingredients to the simmering sauce and stir for 3 to 4 minutes more. Then turn off the heat.
- Prep the sheet pan. Line a large baking sheet with aluminum foil with enough overhang to wrap the ribs. Pro tip: I like to double layer the aluminum foil, to prevent any leaks.
- Prep the ribs. Preheat the oven to 275°F (135°C). Remove the thin membrane on the underside of the ribs. Pro tip: You can also ask the butcher to do this when you buy your ribs. Then place the ribs on the foil-lined baking sheet.
- Bake the ribs in the oven. Take 1 cup of the sauce and mix it with an equal amount of water. Pour this on top of and around the ribs, then lightly wrap the foil around them. Bake the ribs for 3 hours. This process steams the meat, making it incredibly tender while infusing it with flavor.
- Option 1: Finish the ribs on the grill (my preferred method). Preheat an outdoor grill to medium-high heat. After the ribs have finished cooking, use tongs to transfer them to a large platter to carry them to your grill. Note that the ribs will be VERY tender (i.e. fall apart tender) so I recommend using two tongs for stability. Use the remaining sauce to generously brush both sides of the ribs. Place the ribs on the grill and cook for 3 to 4 minutes on each side. Brush additional sauce as desired while grilling, then slice and serve immediately.
- Option 2: Finish the ribs in the oven. After the ribs have finished cooking, remove them from the oven and carefully discard the aluminum foil with watered-down sauce. Place the ribs back on the baking sheet and use the remaining sauce to generously brush both sides of the ribs. Broil the ribs (meat side up) for 3 to 4 minutes, until the sauce begins to caramelize. Brush additional sauce as desired while broiling, then slice and serve immediately.
Lisa’s Tips
- This recipe serves 6. Each rack has about 12 ribs, so you’re looking at roughly 4 ribs per person.
- Make these ahead of time by baking the ribs a day ahead and storing them (still wrapped in foil) in the refrigerator. When you’re ready to serve, let them come closer to room temperature, then finish them on the grill or under the broiler with fresh sauce.
- If you prefer to skip the alcohol, a splash of apple cider vinegar and an extra pinch of ground ginger get you reasonably close.
- Double the sauce. The leftover sauce keeps in the fridge for 3 to 5 days and is phenomenal on my grilled chicken or brushed over pork tenderloin!
Nutrition
©Downshiftology. Content and photographs are copyright protected. Sharing of this recipe is both encouraged and appreciated. Copying and/or pasting full recipes to any social media is strictly prohibited.
This recipe was originally posted May 2015, but updated to include new photos, tips, and information for your benefit!
100% Human Tested: Why It’s Important
There’s just something special about a recipe that gets passed down through generations, with little flavor tweaks and adaptations along the way. Those tweaks are made, based on personal preference, and in the case of these baby back ribs… that’s both my mom and I saying, “hmmm, maybe we should add a little more kick with cayenne pepper or a little more sticky sweetness with molasses.”
And that’s something that AI can’t do! I love my mom’s recipes because I love her taste palate, and for over a decade now, you guys have come to enjoy my recipes because of my own unique spin and approach to flavor, texture, and taste.
These baby back ribs are a perfect example of a unique flavor profile of a BBQ sauce that you’ll never find in a store, but is so unbelievably delicious. Especially on these ultra-tender ribs. And that’s the value of human-developed and tested recipes. 😊
I made this last night, oh, it was such a big hit.
Yay, so happy to hear these baby back ribs were a winner dinner! Thanks, Hollis!
Amazing and so easy. Much better than any commercial sauces I’ve used.
Hi Connie – I’m so glad you loved the BBQ sauce from this recipe!
Thank you for what looks like a fabulous recipe! The BB-Q sauce looks delicious and I am wondering if I made the sauce then water bathed it if it would be shelf stable….looks like a sauce I would want on a lot of things.
Thank you,
Susan
Thank you so much, Susan! I’m so glad the sauce caught your eye—it really is one of those sauces that’s delicious on far more than just ribs. Since this sauce wasn’t specifically developed and tested for canning, I can’t confidently say it would be shelf stable or safe to water-bath as written. Ingredients like fresh pineapple, aromatics, and the overall acidity all affect canning safety, so I wouldn’t want to steer you wrong there. What I can recommend is making a batch and storing it in the fridge for short-term use!
Made this and family RAVED about this! The flavor was amazing! Will be making this again. Thank you
Amazing! I’m so glad the whole family loved these baby back ribs, Eileen!
EXCELLENT sauce and very easy. Not too spicy and very flavorful. I only gave it 4 stars due to the “falling off the bone” result you were going for – which I avoided allowing to happen. I prefer a tender bite/chew. It has been stated by many chefs that when the meat “falls off the bone”, it is technically overdone. I FINALLY found how to get the perfect doneness – used a meat thermometer! Duh! 190 degrees is the sweet spot – over 205 and it went too far. I checked my 2 racks of ribs at the 2 hour mark and I am glad I did, cuz they were done! I had the best ribs ever using your method, Lisa not allowing the meat to overcook. The ribs were very tender but I enjoyed biting them off the bone. I did, however, put a simple rub on as well as using your sauce to cook them in the oven. Finished them on the outdoor gas grill. A KEEPER!!
Hi Jill – Thank you so much for sharing this detailed feedback! I’m thrilled you loved the sauce and found it easy to make. And I completely agree—rib doneness is very much a personal preference. Some people love that fall-off-the-bone texture, while others (like you) prefer a more tender bite with a little chew. That’s one of the reasons I always encourage readers to use visual cues and, when possible, a thermometer rather than relying solely on time.
Made these ribs, your baked beans and potato salad, and all three were absolutely incredible!
Thrilled to hear this trio was the perfect meal for the long weekend, Paige!
I made this for my golf group. My friends raved about this sauce. My ribs were a little too much falling off the bone style, but the flavors were as good as it gets.
Awesome! So happy to hear these barbecue ribs were a hit with your friends, Michael.
It was a big hit. So tender and packed with flavor. Even better than restaurants.
Wonderful! I’m so thrilled you loved these barbecue ribs, Kat!
Made these ribs tonight and they turned out perfect! I was careful handling them to give them lots of support with the tongs after the oven just in case to avoid them falling apart. I didn’t have crushed pineapple/juice or rum so I’m sure they didn’t taste as they should but I substituted with 1 cup of orange juice and they still tasted delicious and like bbq sauce so no complaints here. I also have a jar of leftover sauce now that I’m going to use on pork tenderloin tomorrow! Thank you Lisa!
Oh, wonderful! I’m glad your barbecue ribs turned out perfectly, Hilary!
This calls for baby back pork ribs … could I use St. Louis style ribs???
Holy smokes!!! This is such a good recipe and the sauce is fire (not spicy fire… amazing fire)!!! I was expecting leftovers, but we devoured the whole rack in one night. Ribs were so tender and falling off the bone. I had a good amount of sauce left over that I used on chicken and whatnot.
Hi Kelly – Woohoo! Happy to hear you love these barbecue ribs.
Jan 15/24
The sauce has a wonderful taste. I usually make a new recipe exactly as written, but I didn’t have spiced rum, (I use it in my cranberry sauce also) all I had was cognac, So the next try is with the rum. I have another 2-1/2 hours to wait. Having green frozen beans from my garden this summer.
Since the sauce was rather runny, I am going to tried to finish up the sauce in my Instant Pot, it will be hotter and quicker for another easy meal.
Ribs dry out and become flavorless when you steam it with so much liquid and then discard the drippings. No water should be added! Again, this leaches out the flavor! It’s better to let the meat stew in its own juices. There’s already water in the meat! Even better to cook the ribs with dry heat low and slow on a grill or smoker. This recipe is only good for the sauce! I wasted hours of my life on this and it was a huge disappointment. I should have known better.
OH MY GOODNESS! THESE RIBS ARE EPIC!
First time trying this one. We used real lean baby back pork ribs. I’m a convert! I don’t think I can go back to BBQ ribs with my favorite sauce.
This is the perfect way to eat ribs when it’s summer-out-by-the-Q time. We had coleslaw as the side dish. SAVE THE LEFTOVER SAUCE! It’s like gold!
You could use this on prime rib beef ribs, chicken, roasted pork tenderloin, or just drink the sauce! (might need to add extra rum). We used Captain Morgan Spiced Rum, it really took it up a notch.
Thanks for leaving a review and I’m so glad you’re loving these barbecue ribs!
Love the spiced rum pineapple sauce – it’s my go to barbecue sauce. Just noticed the recipe calls for the following:
2 tbsp spiced ru
1 tbs organic Dijon Mustard – is that suppose to be tbsp?
1 tbs Worchestire sauce – again, suppose to be tbsp?
Please advise and again thank you.
Hi Janet – yes, those are supposed to be tablespoons! I need to go back and update this post soon as this was an older one :)
The recipe was on point, the sauce was exceptionally delicious and the meat literally falling off the bone! Will be doing this one again for Thanksgiving. Thank you for the recipe!
The Pineapple sauce really does make all the difference here :)
Hello,
I would like to use your recipe and have it cooked on our green egg grill. Would I do the same have it for 275 wrapped in foil for 3 hours?! Or can I have it smoked for couple hours than wrap it in foil for another hour under 275?
My fiancé said this was his favorite meal in a long time 😆 score! Neither of us had made ribs before, but we ordered some in our most recent ButcherBox because we wanted to try. This recipe was easy to follow and they turned out wonderful. Thanks Lisa!
Amazed to hear this recipe was a success Lauren! :)
I kept this recipe for awhile and finally made for first time tonight. This was sooooo good and soooo easy to make. I’ve made ribs twice before and just didn’t come out where the meat falls off the bone. This slow and low was perfect-no knife needed. The sauce is amazing.
I don’t have a grill so I used the oven broiler instead and that worked great!
I really appreciate your simple “clean eating” recipes!
Happy to hear you loved these barbecue ribs :)
I wasn’t so sure about adding the pineapple to the sauce as per the recipe. However, best pork ribs I ever made! My family devoured the ribs and said it was one of their favorite recipes! The ribs were very tender and flavor was perfect.
Wonderful! So glad everyone enjoyed the sauce on these ribs :)
Fabulous sauce!! How long does it last in the fridge?
Hi Anne! This will last about 3-5 days :)
Wow etc! That is the response and more I got after making your ribs for a birthday dinner event last weekend June 2nd/19. The sauce is fabulous! I also wrote to you about your vinegar coleslaw which went perfectly with these ribs!
So Thanks again Lisa for your amazing recipes. I do enjoy your website so much and told my girls about you as well as my very happy rib eater guests from England. I gather as a result of this you will have some new followers!
Take care!
Deena
Oh yay! I’m happy you loved this recipe as well Deena! I’ve actually been meaning to update this recipe with new photos (and it’s a good excuse to eat it again). ;) Thanks so much for spreading the Downshiftology love, I truly appreciate it! x
“The best ribs are juicy and fall of the bone… and this recipe delivers, by oven steaming them first.” Really?! I think you need to come up w/ a better description of how amazingly tender these truly are. Seriously! I couldn’t transfer the rack from the foil packet in 1 piece much less get them on the grill w/ any semblance of grace or professionalism. I wonder if 1st tearing away most of the foil, draining the liquid, placing a cutting board on top of the ribs, & then inverting them would keep the rack intact. How did you keep yours together?!? Anyway, none fell through the grill’s cooking grids, which is good, because I may have gone after them w/ or without the tongs. I didn’t bother plating them nicely; I put the cutting board on the table, threw down a couple of paper plates, scattered a few napkins, then The Hubbs & I proceeded to tackle them Fred Flintstone style. ¾ of the way through the meal, he looked up & stated, “Oh, by the way, these are really good. The dressing on the salad is great, too.” Then he disappeared into his food again. For the salad, I threw together a baby spring mix, chopped dried cherries, honey candied pecans (from our trees), seeded grape tomatoes, seeded Kalamata olives, a small very thinly sliced – then halved – Granny Smith apple, sprinkled it w/ Feta crumbles, then topped it w/ the lemon vinaigrette (using very finely diced red onion instead of shallot since that’s what was on hand) from your arugula, !spargel!, & avocado breakfast salad. Dessert was, once again, your chocolate pudding topped w/ chopped hazelnuts (I over toasted them this time – still good – gave it a smoky, robust characteristic), chopped pistachios for giggles (they need to be used before they go stale), & coarse sea salt since I still don’t have flakes. We were so full from dinner that I already had a bowl of pudding for breakfast. (But I did sneak one after midnight. I couldn’t sleep, so I raided the fridge.)
Ha – best picture ever! So glad you liked them – and yes, maybe I should stress a little bit more how tender they are. ;) x
LOL “Liked them” is an understatement. Next time I won’t grill them in the dark so I can better slop on the sauce. I barely had enough of Annie’s Dijon, so I subbed an organic, gluten-free horseradish Dijon for the remaining amount. Past recipes were “off” so I bought an oven thermometer & discovered the oven ran 25 degrees hot. I’m sure there’s a set screw somewhere to adjust that, but now I know to simply adjust the temp. I followed your instructions to the letter. SERIOUSLY. How did you get the ribs from the oven to the platter w/out them falling into pieces / sections? Maybe I should steam them less than 3 hours (that makes me scared they won’t be so tender)? Try the “inversion tactic?” I have a little over a cup of leftover sauce & will use it w/ chicken later this week. Love Love Love this & it will be my go-to rib recipe forevermore. xo
I made them a week later & instead of using regular tongs to move the ribs from the roasting pan to the grill, I supported the majority of them w/ a spatula that has a 3″ x 7″ surface & used large tongs to carefully balance the rest them. I was more careful flipping them, &, voilà! They made it to the table in perfect order. Then, of course, the meat slid off when sliced & the bones were picked clean. I also made them for Super Bowl Sunday & used the hostess’ grill; they disappeared within minutes. A, “I’m not a rib guy,” tried one after some prompting & said he was glad he did because, “Man. Those are really good.” Oh. & if you don’t check supplies & pull off a 9″ piece of foil from the roll just as you’re getting ready to prep them for oven time, a roasting bag like you’d use for a turkey (if luck is shining upon you & a grocery store run isn’t necessary), works just as well.
The reason they were so “fall off the bone”, is because technically they were overdone, as per many chefs would say. Use a meat thermometer and take out and finish when it reaches 190 degrees. Lisa’s recipe is outstanding except overcooking. They will still be super tender, but they stay on the bone and are excellent! Just made them last night!!